Outlining
“You must outline your work. I have what might be called spirited discussions with writers who don’t. For those who are new, unpublished or struggling, outlining teaches you two things. First, it teaches you to think your story through from beginning to end. That keeps you from throwing away 100 pages, and I don’t have that kind of time. Second, if you do make changes—and you will—if you’ve thought it all through, then you know how the change will affect the outline, it gives you a blueprint. I’ve got 6 to 12 months to put together a book. I don’t remember what happened last week. If I don’t have something to steer me, I’ll leave loose ends.” -Terry Brooks
The outline method we will be exploring in this class will help to generate ideas as well as organize them. Therefore, you won’t need to have too many details prior to drafting the outline.
Note: You will likely find yourself touching upon this lesson repeatedly during the writing process.
My outline process is ideal for those who like to plan, yet also prefer some wiggle room for spontaneity. The process is fluid and, in ways, non-linear. While it appears chronological in structure, it does not dictate the order in which you tell the story! This will make more sense once you begin exploring it.
Background:
A few years ago, the public was treated to an intimate glimpse of J.K. Rowling’s writing process. Author outlines fascinate me, and I’ve collected a few photographed and scanned examples over the years. Being a huge Harry Potter fan, this was the pinnacle of outlines. After first viewing J.K. Rowling’s Order of the Phoenix outline (click here to view an image of her outline), I wanted attempt using her method.
Rowling’s outline is a grid showing the chapters numbered down the left-hand side of the page. Horizontally she lists the chapter titles, plot summaries, running story lines, and several characters. In this way, she tracks each element of the book through time, chapter-by chapter, even if she didn’t write about every element in each chapter. This process is brilliant and enables the author to track and prevent plot holes, and follow a character’s full story, even when they’re not being written.
Alas, I couldn’t immediately dig in and try Rowling’s outline as-presented. Rowling had a very solid idea of her story and characters, while I had only a rough story idea (based upon a dream I had) with very few details. I began with no solid plot and only one character. Rowling’s outline segment covers only a few chapters and yet is loaded with nearly a complete story concept. She needed only to write the story, tweak a few details, and polish it.
I needed a system that went beyond organizing an already-devised world and story line, and instead helped to generate all of the ideas.
Therefore, I devised my own method that merged the essence of Rowling’s outline with the One Page Novel approach by Eva Deverell. It was phenomenally successful, and I now use and rely upon this method when writing against a deadline. With it, I can readily see my story’s flow at a glance, and my writing pace increases dramatically.
Note: Should this method be ill-fitted to your needs, please say so and I will offer alternatives. We will (hopefully) have some “guest writers” visit and share their own tips as well.
There are two ways to use this outline, and I use both. First, you fill it all out as a representative of the entire story. Second (and this will come in Lesson 3), you fill it out again, outlining magnified chunks of your story, a few chapters at a time. For now, we’ll just focus on the first use, and outline a full story concept.
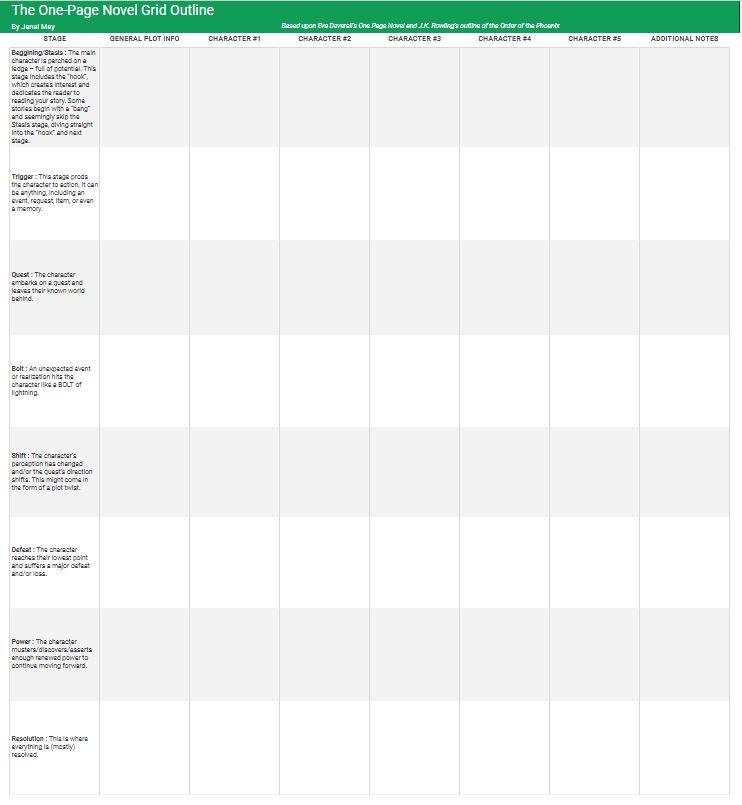
THE ONE PAGE NOVEL GRID OUTLINE (Fumbly’s version)
You do not need to print and fill out my gridded version. You may wish to draw your own grid, or even type it out vertically!
THE STAGES OF A STORY
- STASIS/BEGINNINGS– The character is perched on a ledge and unmoving – full of unused potential. This stage includes what is called the “hook”, which builds immediate interest and dedicates the reader to reading your story. Some stories begin with a “bang” and seemingly skip the Stasis stage, diving straight into the “hook” and next stage.
- TRIGGER– This stage prods the character toward action. It can be an event, request, or even a memory.
- QUEST– The character embarks on a quest and leaves their known world behind.
- BOLT– An unexpected event or realization hits the character like a BOLT of lightning.
- SHIFT– The character’s perception has changed and/or the quest’s direction shifts. This might come in the form of a plot twist.
- DEFEAT– The character reaches their lowest point and suffers a major defeat and/or loss.
- POWER– The character musters/discovers/asserts enough renewed power to continue moving forward.
- RESOLUTION– This is where everything is (mostly) resolved.
Identify your main characters, setting, and some minor characters as well. These can be difficult to track, which is why I prefer using a grid. However, a grid is not ideal for everyone, so please experiment and devise that which will work best for you.
For each stage, write a very brief summary of the plot at that stage. Two or three short sentences should suffice. Do the same for each character. What are they doing and thinking? Where are they? Even if you don’t intend to write about them yet, fill something in here. Even if the character isn’t introduced until half-way into your story, they do exist already, so tell their story in the outline.
Move to the next stage and repeat. You’ll be surprised at how many ideas begin flooding your mind.
HELPFUL TIPS:
- “General Info” : Consider including this box. It may include details regarding the setting, general atmosphere, current events, and other non-character-non-plot-specific information.
- “Etcetera” : Include space for extra notes, ideas, and overflow content from other sections.
- The Other Side : Perhaps an obvious tip. Flip the page over to continue taking notes. I often use that space for longer character details and thoughts.
- Fill Every Box or Section : Even if a character hasn’t entered your story yet, they are doing something. These details may never make it to your story, and yet they often help with flow, familiarity, and consistency.
- Go Big : Give yourself plenty of space. Over-sized grid paper or a wall is probably ideal, though I usually stick with whatever fits in a 3-ring binder.
- Make it Sticky : I don’t have the free wall space for this, and I’m private with my ideas. However, these outlines translate well to a grid of sticky notes that you can shift around, stand back and ponder. Doing this also provides a constant visual reminder and source of inspiration when used in this way.
- Follow the Threads : Did you allude to a crucial detail in Chapter 3, and 5 chapters have elapsed without alluding to it again? The reader has likely forgotten, especially if your initial mention was subtle. This format helps to easily spot plot lines and details that you’ve dropped, allowing you to pull along every thread, consistently, throughout your story.
- Embrace the Disorder : These outlines offer minimal guidance in regards to the order in which you will actually tell your story. You needn’t be trapped into following a particular sequence or story line. If you need to plan, yet also crave freedom, this step will help you immensely.